Building My Personal Website with Astro

Overview
This website is my personal space, where I share not only my web projects but also my interests.
On the home page, you’ll find short introduction sections about me, my blog, and my photography. Each section has a link button so you can explore more details. You can also switch languages using the toggle in menu.
The Resume page highlights my skills, education, work experience, and recent projects.
The Blog page contains technical posts divided into two categories: school projects from my studies at Algonquin College, and personal projects, which are takeaways from my work and self-learning.
On the Tour page, you’ll find an interactive map with markers showing the cities I’ve visited. Click on a marker to explore my travel experiences.
Tech Stack
- Astro: Web framework with server-side rendering
- Tailwind: CSS styling
- React + TypeScript: Custom components
- WAVE + Lighthouse: Improve accessibility and SEO
- CI/CD: Automated deploys with Github Actions && AWS Fargate
- Leaflet: Show interactive tour map
- OpenAI: Summarize and translate posts
- PWA: Installable on devices
- RSS: Blog posts subscriptions
- Google Analytics: Track visitors and traffic
Takeaways
What is Astro
Astro is a modern web framework that builds fast, mostly static websites by rendering UI components to HTML on the server while allowing interactive “islands” of JavaScript where needed.
Astro’s core philosophy is to ship as little JavaScript to the browser as possible. It renders UI components to static HTML on the server at build time, which means visitors enjoy lightning-fast page loads because their browsers have less to download, parse, and execute.
Even though the output is static HTML, the development experience feels thoroughly modern. I can break my UI into reusable components just like in React or Vue. This solves the classic problem of repeating HTML across pages and makes my codebase cleaner and much easier to maintain. Astro also works seamlessly with CSS frameworks with just a few lines of configuration.
For my blog, Astro’s handling of Markdown and Content Collections was a game-changer. I can write posts in Markdown, and Astro’s API automatically validates the frontmatter (like title and pubDate) while providing full TypeScript safety. This makes it simple to query and render all my posts on the blog index page:
import { getCollection } from "astro:content";
const posts = await getCollection("blog");
My website isn’t purely static—it includes an interactive tour map and an AI-powered post summarizer. This is where Astro’s Islands Architecture shines. It lets me “hydrate” individual React components, creating isolated interactive “islands” while the rest of the site remains fast, static HTML. This way, I get the best of both worlds: the speed of a static site with dynamic functionality exactly where I need it.
---
// In an Astro page, I can import and use a React component
import TourMap from '@/components/TourMap.jsx';
---
<html>
  <body>
    <h1>My Travels</h1>
    <p>This part is static HTML.</p>
    <TourMap client:load />
  </body>
</html>
Static Site Generation (SSG) vs Server-Side Rendering (SSR)
Static Pages (SSG) are generated at build time. Astro pre-renders your HTML, so visitors get super-fast pages with minimal JavaScript. This is perfect for content that doesn't change often like my blog posts and the "Resume" page.
SSR: For features that need to be dynamic, SSR is the answer. Pages are generated on the server for each user request. I enabled SSR for my entire site (output: 'server' in astro.config.mjs) primarily for my i18n language switcher. This allows the server to detect the user's language from a cookie and deliver the correctly translated page on the fly. The trade-off is a slight performance hit, as it requires a server to be running.
How a Page With Dynamic Content Is Rendered
This is Astro's most powerful feature: Islands Architecture.
- The page itself is rendered as static HTML at build time (SSG).
- When the page loads in the browser, only the PostContent component is “hydrated”: JavaScript runs for this component, making it interactive.
- The rest of the page remains static and fast, while the map becomes dynamic exactly where you need interactivity.
Use the tour blog page to show the render process:
---
import Header from "@/components/Header.astro";
import Gallery from "@/components/Gallery.tsx";
import PostContent from "@/components/PostContent";
import { getPosts } from "src/content.config";
import { capitalizeFirst, getLocationTitleByLang } from "src/tool";

export const prerender = false;
const slug = `tour/${Astro.params.slug}`;
const location = slug.split("/").slice(1);
const [country, province] = location.map((part) => capitalizeFirst(part));
const description = `Explore Sherman's journey in ${province}, ${country}.`;
const images = Object.entries(
    import.meta.glob<{ default: ImageMetadata }>("/src/assets/travel/*/*/*.{jpeg,jpg,png,gif,webp}")
);
const posts = await getPosts("tour");
// Post may be null, so that the content may be empty
const post = posts.find((p) => { return p.id === slug; });
const { lang, t } = Astro.locals;
---
<html lang={lang}>
    <body>
        <Header />
        <main class="container mx-auto md:px-10">
            <div class="w-full px-4 md:px-0">
                <div class="prose lg:prose-md max-w-none">
                    {
                        post && (
                            <PostContent client:load postId={post.id} type={post.data.type} content={post.body!} lang={lang} />
                        )
                    }
                </div>
                <Gallery title={t.tour.gallery} images={images} client:load />
            </div>
        </main>
    </body>
</html>
1️⃣ Browser requests the page
Browser
  |
  | ---- GET /tour/china/shanghai ---->
  |
Server (Astro SSR)
2️⃣ Server-side rendering (SSR) in Astro
- Astro runs your .astro page code on the server
- Executes the top-level code:
- Server gathers all static content: heading, description, images, posts.
- Prepares HTML for static parts: headings, paragraphs,
placeholder, etc
3️⃣ Server sends HTML to browser
- The browser receives mostly static HTML, even though SSR is enabled
- Dynamic components (PostContent and Gallery with client:load) are still placeholders at this stage
4️⃣ Browser hydrates dynamic components
Browser
  |
  | ---- Load JS for client:load components ---->
  |
PostContent component JS runs
  - Uses postId, type, content, lang
  - Optionally fetches translation or summaries (OpenAI API)
  - Renders interactive content in <div class="prose">

Gallery component JS runs
  - Loads images
  - Handles interactive gallery features (click, zoom, carousel)
5️⃣ Final page in browser
Browser sees:
- Header (static)
- <h1>Shanghai, China</h1> (static)
- PostContent fully rendered and interactive (dynamic)
- Gallery fully functional (dynamic)
- RelatedTourLinks (static)
- Footer (static)
Styling with Tailwind CSS
Utilities
I frequently used classes such as flex, grid, gap-, p-, and responsive variants like md: and lg: for layout, along with text-* classes for typography. Tailwind’s utility-first approach makes it quick to style components without needing a separate CSS file.
Here is an example of my videos section. It displays in one column on small screens (less than 640px), switches to two columns on medium screen (less than 1024px), otherwise, and uses three columns on larger screens:
<div class="mt-5 flex w-full flex-col gap-4 px-4 md:px-0">
  <h2 class="text-xl font-bold md:text-2xl">My Youtube Videos</h2>
  <div class="grid grid-cols-1 gap-4 sm:grid-cols-2 lg:grid-cols-3">
    {videos.map((video) => (
      <div class="flex flex-col items-center">
        <iframe
          class="video-card"
          src={video.src}
          title={video.title}
          allow="accelerometer; autoplay; clipboard-write; encrypted-media; gyroscope; picture-in-picture; web-share"
          referrerpolicy="strict-origin-when-cross-origin"
          allowfullscreen
        />
      </div>
    ))}
  </div>
  <LinkButton
    href="https://www.youtube.com/@shermanliu94"
    title="More Vide"
    target="_blank"
  />
</div>
Customized style
In global.css, I defined a set of theme colors as CSS variables to ensure consistency across the site. I also created custom utility classes, such as .photo-card, which encapsulate common styling patterns. This reduces duplication.
@theme {
  --color-blue: #96c7f2;
  --color-green: #adf296;
  --color-pink: #f396e5;
  --color-yellow: #f2cf96;
  --color-purple: #d8b4fa;
  --color-dark-purple: #ab69e9;

  --font-kablamo: Kablammo, serif;
}

@layer utilities {
  .photo-card {
    @apply h-50 w-full rounded-xl object-cover shadow-md xl:h-70;
  }
}<div class="flex items-center gap-2">
<span class="font-kablamo text-[var(--color-dark-purple)] text-4xl md:text-5xl">
S
</span>
<p class="pt-2 md:text-lg font-semibold flex">
<span class="hidden md:block">herman</span>
</p>
</div>
<img
src=""
loading="lazy"
className="cursor-pointer photo-card"
/>Improve web with WAVE and Lighthouse
WAVE
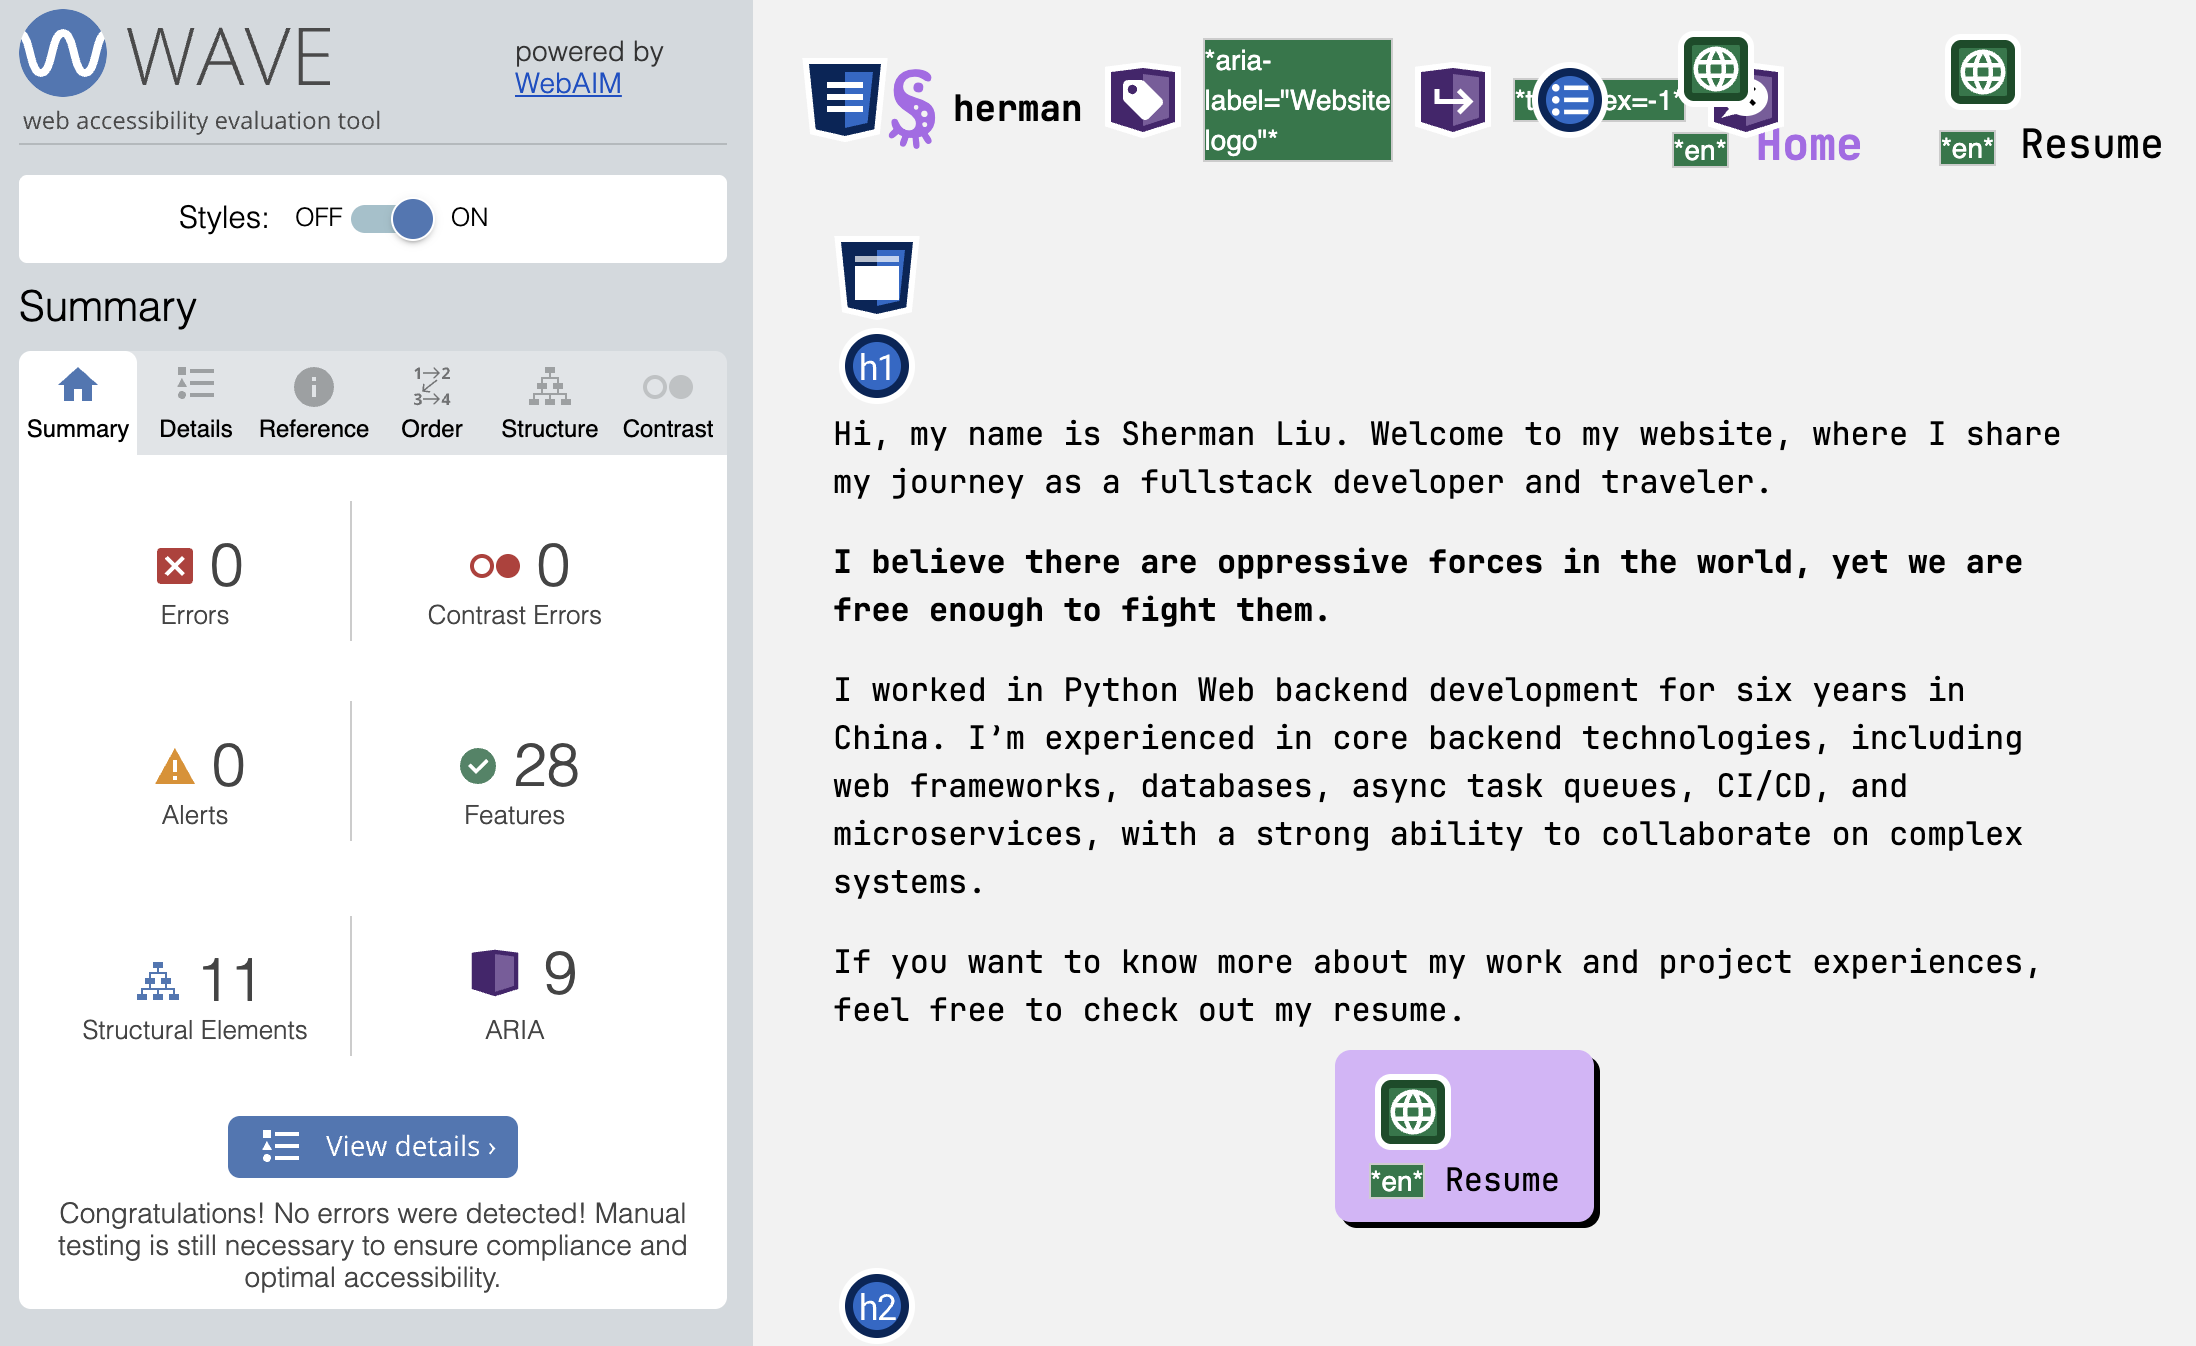
I used the WAVE Chrome extension to check my website's accessibility and it flagged some common issues: low contrast text, empty or skipped headings, missing alternative text, and empty link. After making improvements, there are now no errors on the main page of my website.
Empty or skipped headings
At first, I used heading(h*) elements directly inside components. But when I combined these components on one page, WAVE reported erros such as jumping from h1 straight to h3. This happened because I mixed different heading levels across components. I realized that putting heading tags inside resuable compoents wasn't a good practice. To fix this, I replaced them with p elements styled with different font font size, so I cound avoid breaking the heading hierarchy.
But how to keep semantic headings correct on a page when building resuable components.
Instead of hardcoding h1, h2, etc. inside components, passing the heading level as a prop from the page:
// Component
function Section({ heading, level = 2, children }) {
  const Tag = `h${level}`; // dynamically choose h1, h2, etc.
  return (
    <section>
      <Tag>{heading}</Tag>
      <div>{children}</div>
    </section>
  );
}

// Usage in page
<Section heading="About Me" level={2}>
  <p>Some info...</p>
</Section>

<Section heading="Projects" level={2}>
  <p>Project list...</p>
</Section>

<Section heading="Project A Details" level={3}>
  <p>Details...</p>
</Section>
Empty link
<a href={href} target="_blank" aria-label={`Link to ${href}`}>
  <Icon name={iconName} class="h-8 w-8" />
</a>
In the SocialLink component, I used an Icon instead of text inside the a element. Without an aria-label, WAVE reported an an error: A link contains no text. Adding an aria-label makes the link accessible to screen readers and removes the WAVE error.
Lighthouse
I used Lighthouse, a build-in tool in Chrome to audit my web page. It gives me reports with sugguestions across four areas: Performance, Accessibility, Best Preatices, SEO.
Performance:
Initially, I faced some performance issues, such as slow-loading images and fonts. To fix this:
-
I wrote a python script to convert images from jpg and png to webp, keeping file sizes under 100kb.
-
I added loading="lazy" to img tags, so images only load when visble.
-
I deleted unused font and switched font formats to woff2, which is more efficient.
-
I made the site responsive on different device by using Tailwind's md: lg: utilities.
SEO:
To improve SEO, I added a meta description in BaseHeader component. Every page pass its own the content to it, ensuring that every page has a clear summary for search engines:
<meta name="description" content="" />After implementing these changes, my home page achieved full marks in all four Lighthouse categories.

RSS
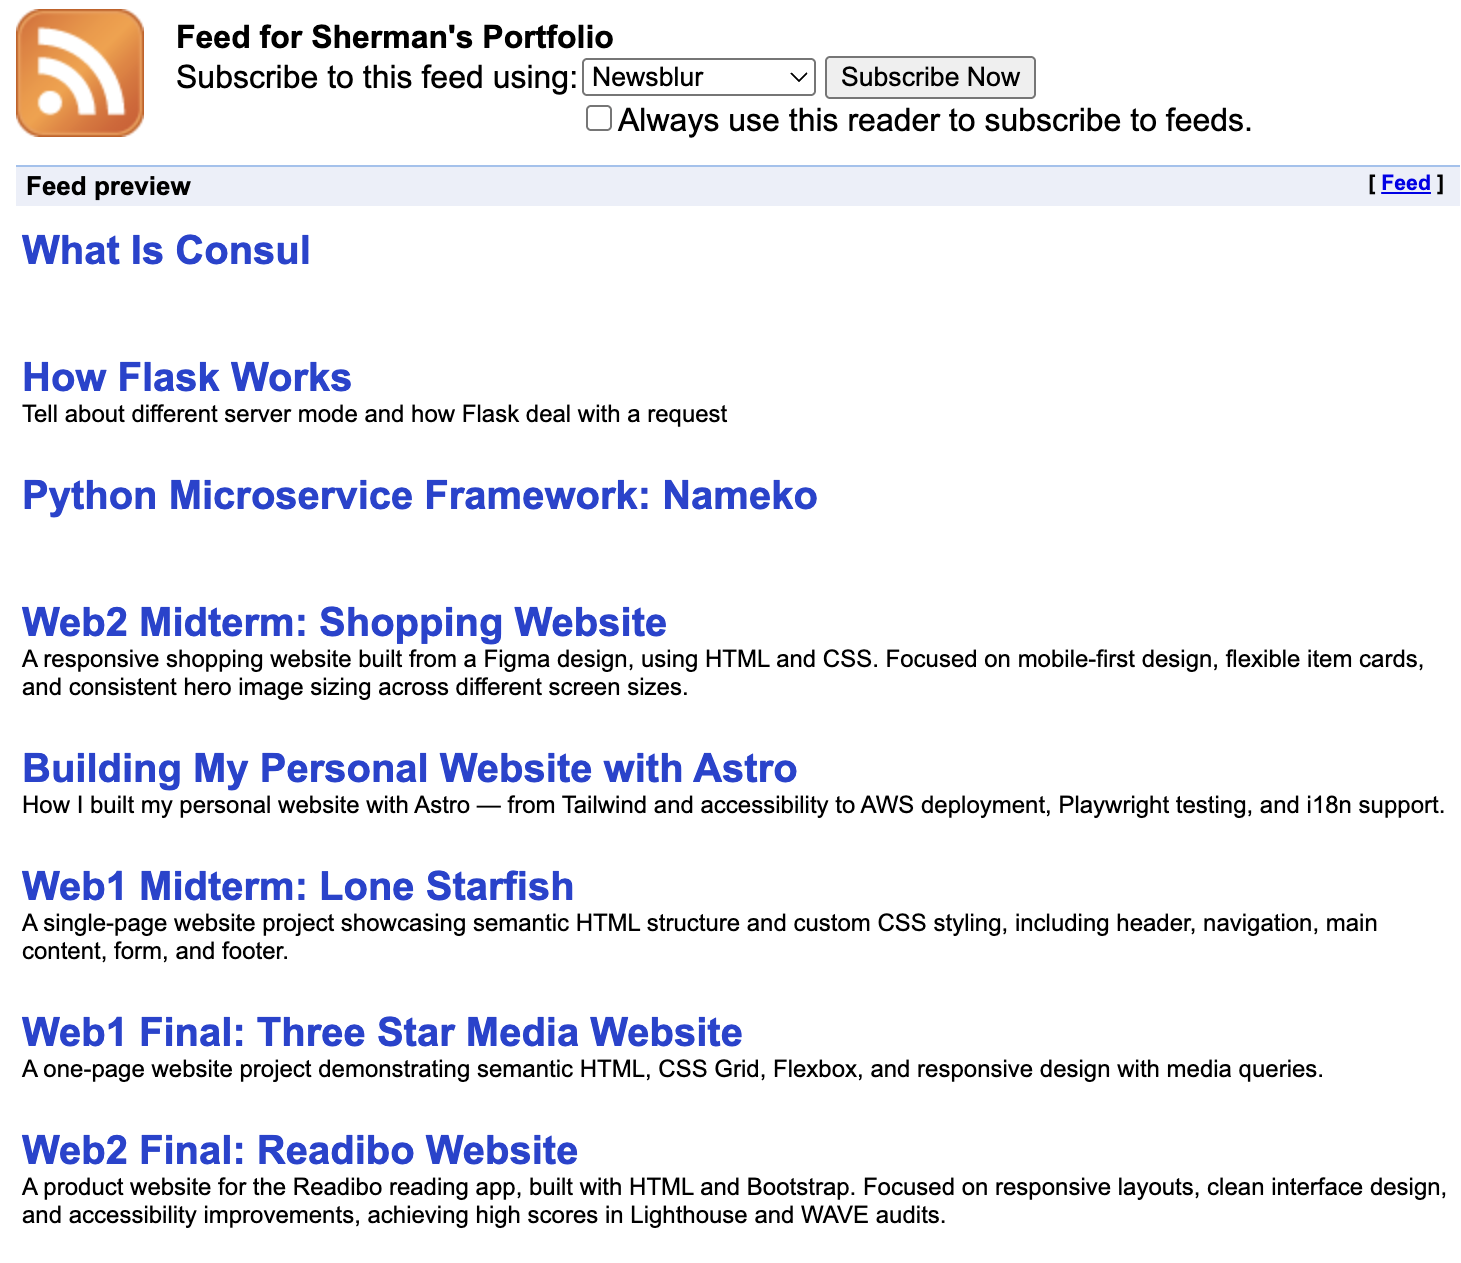
I added a file called rss.xml.ts in the pages folder to generate an RSS feed for my blog. The file uses each blog's link, title, description and pubDate to create a feed in rss format. This allows users to subsribe to my blog by visiting https://www.shermanliu.me/rss.xml in their RSS reader.
import rss from "@astrojs/rss";
import type { AstroConfig } from "astro";
import { getCollection } from "astro:content";
import { SITE_TITLE, SITE_DESCRIPTION, SITE_WEBSITE } from "src/consts";

export async function GET(context: AstroConfig) {
  const posts = await getCollection("blog");

  return rss({
    title: SITE_TITLE,
    description: SITE_DESCRIPTION,
    site: context.site || SITE_WEBSITE,
    items: posts.map((post) => ({
      title: post.data.title,
      pubDate: post.data.pubDate,
      description: post.data.description,
      link: `/blog/${post.id}/`,
    })),
  });
}
My blog feed as displayed in the RSS Subscription Chrome extension:
i18n Support
There is a language switcher in the navigation bar, which supports English and Chinese. When users visit the website for the first time, the page uses the users' browser setting language as the default language. After clicking the switcher, almost every elements on the page, like header, footer, buttons, heading and paragraph show in the coresponding language.
In middleware, I store user language option in cookie and set lang and translation file in context, so that components can get translation easily from the context, avoiding pass it every step.
Here is the middleware code:
export const onRequest: MiddlewareHandler = async (context, next) => {
  let lang: Lang = "en";

  const cookieHeader = context.request.headers.get("cookie");
  const cookieLang = getCookie(cookieHeader, "lang");

  if (cookieLang === "zh" || cookieLang === "en") {
    lang = cookieLang;
  } else {
    const acceptLang = context.request.headers.get("accept-language") || "";
    lang = acceptLang.toLowerCase().startsWith("zh") ? "zh" : "en";
  }

  context.locals.lang = lang;
  context.locals.t = getTranslations(lang);
};

/*
en.json:
{
    "siteDescription": "Welcome to Sherman's website!",
    "photo": { "myPhoto": "My Photo" }
}
zh.json:
{
    "siteDescription": "欢迎来到 Sherman 的网站!",
    "photo": { "myPhoto": "我的照片" }
}
*/
import en from "en.json";
import zh from "zh.json";

const translations = { en: en, zh: zh };
export function getTranslations(lang: string) {
  return translations[lang];
}
How text is displayed:
const { t, lang } = Astro.locals;
<head>
  <BaseHead title={t.resume.title} description={description} />
</head>;
Use AI to Translate Post Content
I write my blog posts in English using Markdown, and I don't plan to maintain seperate language versions since that would add too much extra work.
To handle translations, I build a react component called PostContent, which takes in the content and a lang prop. Inside it, I call OpenAI to translate the content into the selected language. Once the translation is ready, I use shiki and markdown-it to render the Markdown into HTML, and then display it on the page.
Here’s an example of the PostContent component:
import { useState, useEffect } from "react";
import { Loader2 } from "lucide-react";
import MarkdownIt from "markdown-it";
import { createHighlighter } from "shiki";
import { fromHighlighter } from "@shikijs/markdown-it/core";
import { ApiLinks } from "src/consts";

const md = MarkdownIt({ html: true });
const highlighter = await createHighlighter({
  themes: ["dark-plus"],
  langs: ["typescript", "html", "css", "tsx"],
});
md.use(fromHighlighter(highlighter, { theme: "dark-plus" }));

type Props = { postId: string; type: string; content: string; lang: string };

export default function PostContent({ postId, type, content, lang }: Props) {
  const [htmlContent, setHtmlContent] = useState(md.render(content));
  const [loading, setLoading] = useState(false);
  const loadingMessage = lang === "zh" ? "翻译中..." : "Translating...";

  useEffect(() => {
    if (lang === "zh") {
      setLoading(true);
      fetch(ApiLinks.translate, {
        method: "POST",
        body: JSON.stringify({ postId, type, content, lang }),
      })
        .then((res) => res.text())
        .then((translated) => setHtmlContent(md.render(translated)))
        .finally(() => setLoading(false));
    } else {
      setHtmlContent(md.render(content));
    }
  }, [lang]);

  return (
    <article>
      {loading && (
        <div className="flex flex-row items-center gap-2">
          <Loader2 className="animate-spin" size={16} />
          <p className="text-gray-800 italic">{`${loadingMessage} `}</p>
        </div>
      )}

      {htmlContent && (
        <div
          className="prose-headings:my-2 prose-p:mb-1 prose-ul:my-1"
          dangerouslySetInnerHTML={{ __html: htmlContent }}
        />
      )}
    </article>
  );
}
Pros and Cons
Supporting multiple languages improves the user experience by showing the site in each visitor’s preferred language automatically. However, it comes with a trade-off. Pages that could otherwise be fully static — like blog posts — now need to be rendered on the server for each request, which reduces speed and caching benefits.
In Astro, static pages can be pre-rendered at build time and served directly from a CDN, which makes them very fast and cacheable. But with dynamic language switching based on the user’s browser settings or stored cookie, each request may hit the server to render the page in the correct language. This is known as server-side rendering (SSR).
In short: dynamic languages improve UX but require SSR, while static pages prioritize speed and caching.
Alternatives
Pre-render multiple language versions: Build separate static pages for each language (/en/... and /zh/...). This keeps pages fully static and cacheable, but it comes with a trade-off: it increases build size and adds complexity to site management.
Deployed on AWS
To learn how to deploy services on AWS, I migrated my website from Vercel to AWS. In general, there are two main approaches: using EC2 or using Fargate.
- EC2 provides virtual machines where I have full control, but I need to set up the environment (install Node.js runtime, web server, etc.), scaling (add/remove EC2 instances if traffic grows) myself.
- Fargate is a serverless container service managed by AWS. I only need to provide a container image and task definition. AWS automatically finds where to run it, starts/stops the containers and scales up/down based on demand.
Fargate can be cheaper than EC2 for small projects since I only pay for resources per task/second. So I chose Fargate for my website.
Diagram
User Browser
    │
    ▼
Domain (www.shermanliu.me)
    │
    ▼
Porkbun DNS
    │   - "A" or "CNAME" record → ALB DNS name
    │
    ▼
AWS Application Load Balancer (ALB)
    │   - Listens on HTTP:80 / HTTPS:443
    │   - Routes traffic to Target Group
    │
    ▼
Target Group
    │   - ECS registers running Fargate tasks here:
    │       - Task A → 10.0.1.23:4321
    │       - Task B → 10.0.2.45:4321
    │   - Health checks
    │
    ▼
AWS Fargate Service
    │   - Runs 1+ Tasks based on Task Definition
    │       - containerPort: 4321
    │       - app listens on 0.0.0.0:4321
    ▼
Fargate Task (Container)
    │   - ECS pulls the image from ECR to start task
    │   - Application code runs inside container (Astro)
    │   - Exposes port (4321)
    │
    ▼
Application (Website/API)
How to Deploy Website on Fargate
- Create a Dockerfile Build a small size Docker image for the service. Example:
FROM node:20-alpine AS builder
WORKDIR /app
# Copy only package files first to leverage Docker cache
COPY package.json package-lock.json ./
RUN npm ci
COPY . .
RUN npm run build
FROM node:20-alpine AS runtime
WORKDIR /app
# Only copy built output and package.json (optional: needed if server requires dependencies)
COPY --from=builder /app/package.json ./
COPY --from=builder /app/dist ./dist
COPY --from=builder /app/node_modules ./node_modules
ENV HOST=0.0.0.0
ENV PORT=4321
EXPOSE 4321
CMD ["node", "./dist/server/entry.mjs"]-
Set up an IAM user: Create a user in IAM user for the AWS CLI
- Asign ECS, EC2 related permissions policies
- Save the Access Key ID and Secret Access Key
-
Configure AWS CLI
- Install the AWS CLI
- Run aws configure and enter:
- AWS Access Key ID (from IAM user)
- AWS Secret Access Key (from IAM user)
- Default region (ca-central-1)
- Output format (json )
-
Push Docker image to ECR
- Create a repository in ECR
- Use the “View push commands” option to log in and push your image
-
Create an ECS Cluster
- Infrastructure: AWS Fargate (serverless)
-
Create a Task Definition
- Launch type: AWS Fargate
- Operating system/Architecture: Linux/ARM64 (since the Docker image was built on an Apple Silicon Mac)
- Task size: 0.5 vCPU, 0.5GB memory
- Task roles:
- Task role: None. (If app needs to access DynamoDB, to create a role with DynamoDBAccess Permissions Policy in in IAM and use it here)
- Task execution role: ecsTaskExecutionRole (used by ECS to pull images and write logs)
- Container settings:
- Image URI: from ECR
- Port mappings:
- Container port: 4321
- Protocol: TCP
- Port name: container-4321-tcp
- App protocol: HTTP
- Environment variables: OPENAI_API_KEY
- Enable log collection
-
Create a Security group (for the Load Balancer)
- VPC: default
- Inbound rules:
- Type: HTTP, Source: anywhere(0.0.0.0/0)
- Type: HTTPS, Source: anywhere(0.0.0.0/0)
-
Create a target group (may have better options)
- Target type: IP adresses
- Protocol: HTTP, Port: 80
- IP address type: IPv4
- Protocol version: HTTP1
- Advanced health check settings (Health check port: Override 4321)
-
Create a Load balancer
- Load balancer types: Application Load Balancer
- Scheme: Internet-facing
- Load balancer IP address type: IPv4
- VPC: default
- Availability Zones and subnets: select all subnets
- Security groups: use the one created in step 6
- Listeners and routing:
- Listener: HTTP-80, Default action: select the target group in step 7
- Listener: HTTPS-443, Default action: select the target group in step 7
- Secure listener settings
- Certificate source: From ACM
- Certificate (from ACM): Request new ACM certificate
-
Create a Service
- Task definition family: Select the task definition created before
- Task definition revision: the latest version
- Compute options: Launch type (FARGATE)
- Netwroking:
- VPC: defalut
- Subnets: default
- Security group: Use an existing security group
- Security group name: default
- Load balancing:
- Check use loadbalance
- Load balancer type: Application Load Balancer
- Use an existing load balancer: select the loadbalance created in the previous step
- Create new listener: Port-80, Protocol-HTTP
- Use an existing target group: Select the group created in the previous step
-
Test the Service
-
Find the public IP of the running task (35.183.5.105:4321). Note: this IP changes whenever the task restarts. For security, after testing is successful, update the security group of the task to only allow inbound traffic from load blancer instead of the public internet.
-
Use the DNS name of the load balancer (portfolio-143384066.ca-central-1.elb.amazonaws.com), which is static.
- Add a CNAME Record in Porkbun
- Open DNS records
- Click Add Record
- Type: CNAME
- Host: www
- Answer: p AWS Load Balancer DNS (portfolio-143384066.ca-central-1.elb.amazonaws.com)
Github Action
I added a deploy.yml workflow in .github/workflows and configured the variables and secrets, such as ECR_REGISTRY_CA, ECS_CLUSTER_CA, AWS_ACCESS_KEY_ID, AWS_SECRET_ACCESS_KEY in GitHub settings. This way, GitHub Actions can build the Docker image, push it to ECR, and automatically restart the ECS service whenever I push code to the main branch.
name: Deploy to AWS Fargate

on:
  push:
    branches:
      - main

jobs:
  deploy:
    runs-on: ubuntu-latest
    env:
      ECR_URI_CA: ${{ vars.ECR_REGISTRY_CA }}/${{ vars.ECR_REPOSITORY_CA }}:latest

    steps:
      - name: Checkout repo
        uses: actions/checkout@v4

      - name: Set up Node.js
        uses: actions/setup-node@v4
        with:
          node-version: "20"

      - name: Install dependencies
        run: npm ci

      - name: Build Astro project
        run: npm run build

      # --- Canada ---
      - name: Configure AWS credentials (Canada)
        uses: aws-actions/configure-aws-credentials@v4
        with:
          aws-access-key-id: ${{ secrets.AWS_ACCESS_KEY_ID }}
          aws-secret-access-key: ${{ secrets.AWS_SECRET_ACCESS_KEY }}
          aws-region: ${{ vars.AWS_REGION_CA }}

      - name: Log in to Amazon ECR (Canada)
        uses: aws-actions/amazon-ecr-login@v2

      - name: Build, tag, and push Docker image
        run: |
          docker buildx build \
            --platform linux/arm64 \
            -t $ECR_URI_CA \
            -t $ECR_URI_SG \
            . --push

      - name: Deploy to ECS (Canada)
        run: |
          aws ecs update-service \
            --cluster ${{ vars.ECS_CLUSTER_CA }} \
            --service ${{ vars.ECS_SERVICE_CA }} \
            --force-new-deployment \
            --region ${{ vars.AWS_REGION_CA }}
Deploy on Two Regions
-
Deploy Service on Singapore Region: Switch to Singapore region, do the same steps from creating ECR to creating a service in the previous section
-
Create two latency-based routing records in Route 53, one for Canada, one for Singapore
- subdomain: www
- Record type: A - Routes traffic to an IPv4 address and some AWS resources
- Enable Alias
- Route traffic to: Alias to Application and Classic Load Balancer
- Select the region where service runs on (Canada, Singapore)
- Choose load balancer
- Routing policy: Latency
- Region: Select the region where service runs on (Canada, Singapore)
- Record ID: a unique label
- Point porkbun to AWS Route 53
- Find 4 NS (name server) records on Route 53
- Go to Porkbun → Domain → DNS → Change Name Servers to the 4 NS
- New Diagram
User Browser
    │
    ▼
Domain (www.shermanliu.me)
    │
    ▼
AWS Route 53 (Latency Routing: users always connect to the fastest available server)
    │   ┌───────────────┐
    │   │               │
    ▼   ▼               ▼
Canada Record       Singapore Record
("canada-latency")  ("singapore-latency")
    │                   │
    ▼                   ▼
ALB (Canada)         ALB (Singapore)
    │                   │
Target Group          Target Group
    │                   │
    ▼                   ▼
Fargate Service       Fargate Service
    │                   │
Tasks (Canada)        Tasks (Singapore)
    │                   │
    ▼                   ▼
Application Application- Update Github Action: Push Docker images to two regions and update their ECS services when pushing to the main branch
Use Cloudfront to Cache Website
CloudFront is a Content Delivery Network (CDN) from AWS. It caches website content at edge locations around the world, so users can get content from a location nerm them instead of going all the way to the server. I use it to replace the Singapore server, so I only need one Fargate service behind a load balancer.
How a user get a web page with CloudFront:
User
  |
  v
www.shermanliu.me
  |  (DNS resolves to CloudFront distribution)
  v
CloudFront Edge Location (closest to user)
  |
  |---> If content is cached at this edge:
  |         - CloudFront immediately returns cached content
  |         - No request goes to ALB or ECS
  |
  |---> If content is NOT cached:
            - CloudFront makes HTTPS request to Origin
            - Origin Domain Name: ALB DNS or custom domain pointing to ALB
            - Custom Host Header may be added to match SSL certificate
            |
            v
     ALB (Canada region)
       |
       v
    ECS Fargate Tasks
       |
       v
    Astro Application
       |
       v
     Response returns
       ^
       |
  CloudFront caches the response at edge
       ^
       |
  CloudFront returns response to User
Steps to config CloudFront with a load balancer:
- Create a CloudFront distribution
- Distribution type: Single website or app
- Origin type: Elastic Load Balancer
- Origin: choose the the ALB DNS name
- Protocol: HTTPS only
- Origin settings: use recommended defaults
- Cache settings: use recommend defaults
- Add your domain names:
- create an SSL certificate in AWS Certificate Manager (ACM)
- Update DNS in Porkbun
- point www.shermanliu.me (CNAME) → CloudFront distribution domain
Test if CloudFront works:
Open Developer Tools in Chrome and check the Response Headers of any request.
- via: shows the proxy path
- example: 1.1 1ae14aa445913f4c479a3d039e84ef4c.cloudfront.net (CloudFront)
- x-amz-cf-id: unique identifier for the CloudFront request
- uaOYa27lBYywwMWzusYMBC8mkAWDx8oNedrv83bRPt9qxYDRz6kmOQ==
- x-amz-cf-pop: edge location (POP = Point of Presence) that served the request
- example: TO53-P1 (Toronto edge location)
- x-cache: cache status
- Hit from cloudfront
- Miss from cloudfront
Google Analytics
Google Analytics helps track how users interact with your site — for example, which city they are from, which pages they visit, and how long they stay.
The way to use it:
- register account, create a new property for the site and get GA_MEASUREMENT_ID (looks like G-XXXXXXX)
- add tracking code in head:
// ga.js
window.dataLayer = window.dataLayer || [];
function gtag() {
  window.dataLayer.push(arguments);
}
gtag("js", new Date());
gtag("config", "G-XXXXXXX");
---
const isProduction = import.meta.env.MODE === 'production';
---
{isProduction && (
<>
<script async src={"https://www.googletagmanager.com/gtag/js?id=G-XXXXXXX"}></script>
<script src="/ga.js" is:inline />
</>
)}Progressive Web App (PWA)
A Progressive Web App (PWA) is a web application that works like a native app, enabling offline access, fast performance, and installability on devices. Turning a website into a PWA only requires a few steps, including adding a web app manifest, serving the site over HTTPS, and registering a service worker.
-
install @vite-pwa/astro
-
add config in astro.config.mjs
import AstroPWA from "@vite-pwa/astro";

export default defineConfig({
  output: "server",
  integrations: [
    AstroPWA({
      registerType: "autoUpdate",
      manifest: {
        name: "Sherman Portfolio",
        short_name: "Portfolio",
        display: "standalone",
        start_url: "/",
        background_color: "#ffffff",
        theme_color: "#ffffff",
        icons: [
          {
            src: "/favicon/android-chrome-192x192.png",
            sizes: "192x192",
            type: "image/png",
          },
          {
            src: "/favicon/android-chrome-512x512.png",
            sizes: "512x512",
            type: "image/png",
          },
        ],
        screenshots: [
          {
            src: "/screenshot-desktop.webp",
            sizes: "1385x845",
            type: "image/webp",
            form_factor: "wide",
          },
          {
            src: "/screenshot-mobile.webp",
            sizes: "386x843",
            type: "image/webp",
            // form_factor omitted → defaults to mobile/other
          },
        ],
      },
      workbox: {
        maximumFileSizeToCacheInBytes: 5 * 1024 * 1024, // 5 MiB
      },
    }),
  ],
  site: "https://www.shermanliu.me",
});-
remove manifest.webmanifest file in public folder, vite-pwa will create one automatically
-
add the manifest link in head
<link rel="manifest" href="/manifest.webmanifest" />When you open the website in Chrome, an install icon will appear at the right end of the address bar in Chrome. Clicking it will install the PWA on your device.
Offline Support
TODO
Thanks
Shoutout to Jramma for sharing the Astro theme, which helped me build my own website faster.
Thanks to ChatGPT, Gemini and Copilot. ChatGPT helped me not only with development tasks, such as generating code snippets, writing posts and fixing errors, but also with end-to-end testing and deployment on AWS. Copilot automatically completed code accurately, which saved me a lot of time. Sometime, I feel like an agent: giving prompts to AI, testing the codes I get back and repeating the process until the results meet my needs.